
We had our decking materials delivered to our house about two weeks ago. Since then it’s been terrible weather around our neck of the woods. This past weekend we finally got some really great fall weather and we were able to get out and work on our deck some more.

Since the decking we chose (Timbertech Earthwood Evolutions in Brown Oak) has a unique profile and because the cut edge of a composite board isn’t exactly attractive we decided to install picture frame boards around the perimeter of the deck.
We did some research and a lot of thinking ahead to figure out how we wanted to go about installing our decking. We decided to install the picture frame on the two front edges, across the top of the stairs and down the left side first.
To do this we cut the boards to length and notched them to fit around our posts. We ended up going with a 1 1/2″ overhang which turned out to be perfect for our materials and how we installed the railing posts.
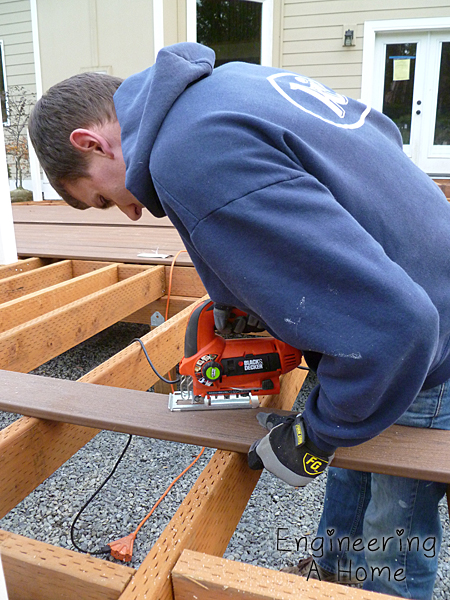
Chris marked the locations of the posts and used a jig saw to cut out the notches.

After we had dry fit all four pieces Chris pre-drilled holes for face screws.

Then he screwed the boards in place.

For the picture frame and any other face screwing we did on the deck we used TopLoc deck screws. These are the screws made by Timbertech and then come in colors designed to match their decking.

After the first set of picture frame boards were secured we set the first full board in place behind it. You can see it extending to the other end of the deck here. Since the first board is square edged to look nicer it didn’t have the groove for hidden fasteners. So we had to screw down the front edge of the second board. On the other side we installed our chosen hidden fastener.
It’s hard to tell in this picture but we decided to keep all the full length deck boards uncut so that we could trim them all at once just before installing the last picture frame board. That way we hoped to achieve a better looking finished edge.

After doing more research and talking to our local lumber store we ended up deciding to go with the Trex Hideway Universal Hidden Fastener, even though Timbertech does make their own hidden fastener. These fasteners ended up being the less expensive option even over face screwing. One of the reasons we chose these fasteners was because they gave a full 1/4″ gaping between boards. We also like that since the screws didn’t install at an angle theoretically if a board is damaged later we can pull it out without having to take out all the boards that were installed after it. Unfortunately we have to say that since the heads on these screws are less than fantastic they seemed to strip quite a bit which may make them impossible to remove later.

Back to installing the decking; after the next board was screwed down on one side he installed the hidden fasteners along the other side. Then Chris slid the next board into place behind it. He used a rubber mallet to snug the board up with the previous.

Then he went back and tightened the fastener behind the board and loosely installed the next set of fasteners in place. Chris found that if he installed the next fastener too tightly is made it a lot harder to snug the the following board up to it. Thus the reason you see him here tightening the fastener in between the two boards after the next was installed.

We kept moving backwards installing board after board until we came to a railing post. We did some marking and measuring and Chris used the jig saw again to cut a notch in the end of a board.

After that we were off again moving towards the house working around posts and corners in the deck as we came to them. For the shorter boards towards the back of the deck we cut them to length before we installed them. Since they sit flush with the next level and because we planned on installing a riser board over the top of the cut ends.

Once we had all the boards secured going back toward the house we moved back to the front of the deck and worked forward from the first board we installed.

This made for a pretty long day but we got a lot of the main level done. All that was left was to trim the boards on the left hand side and install the picture frame. Since it was getting dark we also left the final picture frame board on the back of the main level for the next day.

The next morning we came out and got right to work. In fact I got so distracted by the process of working that I forgot to take some photos of what we did first.
To recap we cut and installed the last two picture frame boards on the main level. To install the board on the right side we first had to trim all the uneven ends of the boards that we left full length. Chris did this be first marking a line and then he used a circular saw to trim the boards to length.
Since the next two levels are much smaller we decided to install all the picture frame boards first. Then we cut to length and installed all the interior boards. This was done in pretty much the same way as the day before. We started at the edge farthest away from the house and worked back toward the house so that any ripped boards would be closer to the house.

After all the work the day before it seems interesting that it took almost as long to deck the two smaller levels as it took to deck the main level.

I guess that’s because the small decks required more notching and small cuts and a more careful measuring.

I am so happy to finally have a surface on our deck. I really did not like walking out the back door onto open joists.

Before the sun set too far we were also able to cut the boards for the first step. Of course we ran out of screws but at least it was ready to go.
The next morning we came out intending to start installing railing. Instead we spent a couple hours doing some finishing touches before we had to leave in the early afternoon.

The last things we did was cut the final stair tread boards and the boards to cover the joists in between the multiple levels.

We still didn’t have screws to finish it off but it’s all ready to go so I’m calling it decked.

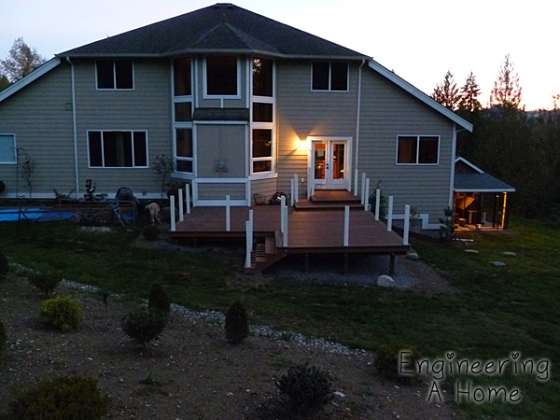
I still just can’t get over how it looks with all the decking installed. I think all the extra effort to install the picture frame boards was worth it.


I’m excited that we are so much closer to finishing and getting our final inspection.

Hopefully later this week we will get some more clear skies so that we can install the railing. (Update: we finished the railing)
Want to catch up with the rest of the deck process? Up until now we have explained how we designed the deck. We also talked about how we got our permit, prepped the ground, dug our footing holes and passed our first inspection. After the holes were dug we poured concrete and put down landscape fabric and gravel. With the base completed we installed our posts and beams. Then we came back and installed the joists, blocking and railing posts and passed our second inspection. While we were waiting out the heavy rains I talked about choosing our decking materials and how it was all delivered.

Wow, that looks great, Chris and Kaity. Good job. We will come see it sometime. Looks so professional and Dad likes the way you attached the boards. You can tell him all about it when we get there. Next comes the railing.
Love, Grandma and Grandpa
_____
Wow! I can only imagine your sense of satisfaction once everything is done and you’ll know you did it ALL! =D
and exhaustion in being reminded how much work it was. 🙂