You may not have really noticed yet but the room we are using as the nursery doesn’t have a closet. It’s not really a bedroom but more of an office space. The reason we are using it is because it’s the only other enclosed room on the main level, which is where our master bedroom is. (For a better picture check out the floor plan page)
I say all of this to explain why I wanted two separate dressers in the nursery. I’m trying to get as much storage as possible in the small space.
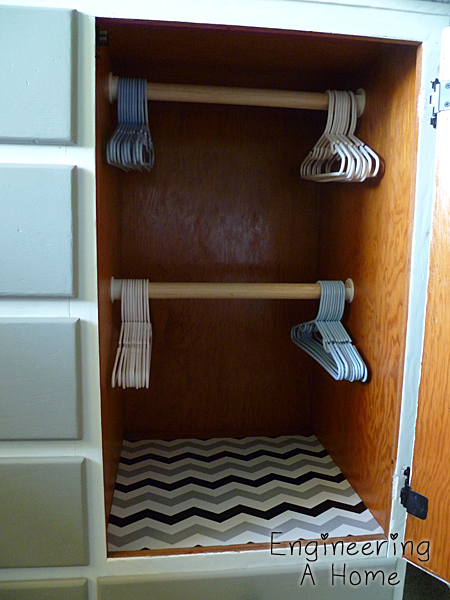
The first dresser is actually a baby dresser. My grandfather made it many years ago when my uncle was born. It has 6 drawers and it has a hanging rod behind the larger door.

I also wanted another shorter dresser that I could double as a changing table. I debated about what to get as a second dresser and originally considered buying something new. In the end I remembered that we had an extra Hemnes dresser that we weren’t really using in the guest room. It didn’t seem like too much extra work to paint it at the same time as the other dresser.

To get started we brought everything out into the garage and gave all the surfaces we wanted to paint a sanding.

We didn’t sand down to bare wood. We were really just looking to degloss the surfaces.

Then we just used foam rollers to apply one coat of primer. As you can see we really only painted the visible surfaces. The primer we used was Miller paint’s stain blocking primer.

After talking to the guy at the paint store we decided to just paint one coat of the primer even though it wasn’t very opaque.

Then we came back with the final paint and painted away. We painted the drawers faces with left over flagtone grey (MSL247) from the guest room painting.

For the main part of the cabinets I picked up some new white paint in the Kelly Moore Dura-Poxy. The color I had it tinted to was Miller Paint’s Cyprus Spring (0411). The baby dresser really only needed two coats of paint but I think we might have done three anyway.
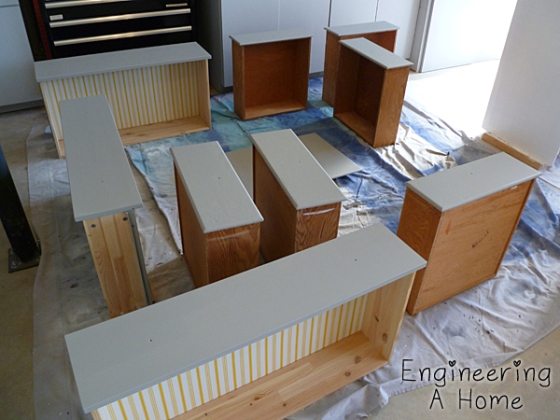

As for the short black dresser it really needed the three coats. In hindsight we should have done at least two coats of the primer but it still worked out fine.

Once everything was thoroughly dried we brought the cabinets inside and put on the new hardware.

I was worried that the two different styles wouldn’t look very good together but once they were painted and sitting side by side I think they look pretty good.

All the knobs came from Hobby Lobby and it’s so nice that they all match and look more updated than the original ones.


I added some drawer liners to the bottom of the drawers since they were a little rough and I thought it would protect whatever we put inside them. I found this drawer liner on amazon and I really liked the pattern and colors. (It may still be available so here’s the link I used) The liner wasn’t perfect because it was a little shorter than the drawer depth. If I rotated the pattern I could have filled the whole drawer but I didn’t think it was worth it with the pattern. Just something to consider if you’re thinking about buying this drawer liner since it has a directional pattern.

I even ended up adding some drawer liner to the bottom of the closet area so that it would match. Chris also installed a second closet rod in the cabinet. I’m not sure that it’s really going to be tall enough to hang things on but we can always just take it out later.
Beside the chair cushions this was probably the most time consuming project for the nursery. I’m glad they are finally done and ready to use. I am getting so close to being finished with this room. I can’t wait to finally feel like the room is ready.